
Goal Counter
Project Purpose: To make a system that counts each ball entering the goal, reflects it on the LCD screen, and makes a sound from the buzzer, using a Pinoo control card, ultrasonic distance sensor, buzzer module and LCD display module.
Duration: 2 lessons
Age group: 7 years and older
Pinoo Set: Maker set and full set.
Achievements:
Learns to code Pinoo control board.
Learns to use ultrasonic distance sensor.
Learns to use LCD screen.
Learns to use buzzer.
Develops algorithmic skills.
Coding skills develop.
Materials to be used: Mblock 3 program, pinoo control card, ultrasonic distance sensor, buzzer module, LCD display module, connecting cables.
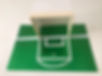
Materials Needed for Design: White cardboard, green mirrored cardboard, wooden stick, white electrical tape, utility knife, glue gun, and silicone.
Project Construction:
For our project, we first get our wooden sticks.
We combine our wooden sticks with the help of a silicone gun to give the appearance of a castle.
For the back of our pen, we cut our white cardboard as in the picture. (Carton dimensions should be the same as the cardboard dimensions.)
We stick the white cardboard we made for the back of the castle on the back of the wooden sticks we made for the castle.
We stick our pencil on the green mirrored cardboard floor with the help of a silicone gun.
Then we define our goal line with the white band. For the penalty area lines, we complete it with white cardboard.
We place our LCD display module, distance sensor and buzzer module as in the picture. We're adjusting our distance sensor to look at the ground so we can see the ball pass. In this way, we finish our design part.
Adding Pinoo extension:
From the Extensions tab, click "Manage Extensions".
In the window that opens, we write “Pinoo” in the search engine and it is enough to say download to the result. Installed on our computer.
Connecting the Pinoo control board to the computer:
In Mblock 3, we click on the "Connect" tab in the upper left.
In the window that opens, we click on the "Serial Port" section and select the "COM6" option from the page that opens.
NOTE: As each computer has different port entries, the numbers next to COM may change.
Click on the Cards tab.
From the window that opens, we select the "Arduino Nano" card option used by the Pinoo control card.
Click on the Extensions tab.
In the window that opens, we select "Pinoo", the extension of the control card we use.
Click on the Connect tab.
Click "Firmware Update" from the window that opens.
Coding part:
First, we place our lcd screen identification code under the 'Pinoo Program' code to check whether our lcd screen module is working. Then we place our 'Pinoo LCD Print' code and say upload it to the arduino. After the download is finished, 'Hello World!' We see the text. In this way, we check the working status of our LCD screen.
We check our Buzzer module by running the code below with the code that makes a sound when the green flag is clicked.
First, to check whether our ultrasonic distance sensor is working or not, we check the working status of the distance sensor with our 'Say Hello' code under the 'When Clicked' code on our panda puppet.
To count our goals, we create a variable from the Data&Block section and call our variable 'count'.
Since we cannot operate our LCD screen under the 'Green Flag' event, we pass the value of 0 to our count variable under the 'Pinoo Program' event. We are placing our prepare code for the purpose of introducing our LCD screen. At first, we saw that our distance sensor reads 12 cm. According to this value, when the value of our distance sensor is less than 10 cm, our buzzer module will work for half a second. Then, we printed the text 'Number of Goals: '(it should not be a Turkish character) on the 1st Line 1st Column of our LCD screen. Then, since the text we printed was 13 characters, we also printed our number variable from the 1st line to the 14th column and increased our number variable with 1 second intervals.
Right-click on the “Pinoo Program” command and select the “Install to Arduino” option in the window that opens.
On the page that opens, we click on the "Upload to Arduino" button, which is selected in red. Our codes are uploaded to our Pinoo control card.
After the “Installation Finished” message comes, click the “Close” button. After the installation is finished, the battery holder is inserted and the project is run.
Working Status of the Project:
We reflected our goal values on our LCD screen and we have completed our project.
ARDUINO IDE CODES:
// define the pins of the distance sensor
int echoPin = 8;
int trigPin = 9; // we defined the variables named distance and duration
long distance, sure; // added lcd display libraries
#include <Wire.h>
#include <LiquidCrystal_I2C.h> LiquidCrystal_I2C lcd(0x27, 16, 2); // the screen type is written
int buzzer = 2; // assign the buzzer to pin 2.
int counter = 0; // we created a variable named counter
void setup()
{
Serial.begin(9600); // We started the serial monitor // We define the pins of the distance sensor as input and output pinMode(echoPin, INPUT);
pinMode(trigPin, OUTPUT);
lcd.init(); // screen initialized
lcd.backlight(); // the lights of the screen turned on
pinMode(buzzer, OUTPUT); // is the buzzer output pin
}
void loop()
{
// initialize the distance sensor
digitalWrite(trigPin, LOW);
delayMicroseconds(5);
digitalWrite(trigPin, HIGH);
delayMicroseconds(10);
digitalWrite(trigPin, LOW);
sure = pulseIn(echoPin, HIGH);
distance = time / 29.1 / 2; // measured the distance
if (distance < 10)
{
// if the distance is less than 10
digitalWrite(buzzer, HIGH);
delay(500);
digitalWrite(buzzer, LOW);
delay(500);
counter = counter + 1; // counter increment by 1 // writes the number of goals to the LCD screen
lcd.clear();
lcd.print("Number of Goals = ");
lcd.print(counter);
lcd.setCursor(0, 14);
delay(1000);
}
}


.jpg)


