Traffic Light
Project Purpose: To make a traffic light system using Pinoo Control Card and green, yellow and red led module.
Duration: 2 lessons
Age group: 7 years and older
Pinoo Set: Basic set, invention set, maker set and full set.
Achievements:
Learns to code Pinoo control board.
Learns to use led module.
Develops algorithmic skills.
Coding skills develop.
Materials to be used: Mblock 3 program, pinoo control card, red, yellow and green led module, connection cables.
Materials Required for Design: Black cardboard, white electrical tape, tongue stick, black cardboard, scissors, glue gun and glue.
Project Construction:
For our project, we first start with the road view on our black cardboard. We make the road and pedestrian path with the help of white tape.
We cut and flatten the underside of our tongue stick. Then we bring the small piece we cut into a rectangular shape. After fixing our tongue bar, we fix the small piece as in the picture to support it.
We fix our LEDs in the form of red, yellow and green with the help of a silicone gun and we have finished our design part. Let's pay attention to which doors we put our leds on the pinoo control card. (1.Door:Red Led, 2.Door:Yellow Led, 3.Door:Green Led)
Adding Pinoo extension:
From the Extensions tab, click "Manage Extensions". In the window that opens, we write “Pinoo” in the search engine and it is enough to say download to the result. Installed on our computer.
Connecting the Pinoo control board to the computer:
In Mblock 3, we click on the "Connect" tab in the upper left. In the window that opens, we click on the "Serial Port" section and select the "COM6" option from the page that opens.
NOTE: As each computer has different port entries, the numbers next to COM may change.
Click on the Cards tab. From the window that opens, we select the "Arduino Nano" card option used by the Pinoo control card.
Click on the Extensions tab. In the window that opens, we select "Pinoo", the extension of the control card we use.
Click on the Connect tab. Click "Firmware Update" from the window that opens.
Coding part:
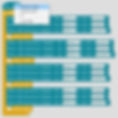
In order to control our LED module, we flash it with the code 'Change the LED status' under the 'key pressed' code.
Our code, which will be repeated continuously under the 'Green Flag' code, is to first turn on our red led for 5 seconds and at the same time turn off our yellow and green leds. In the same way, we made our yellow LED light for 1 second and our green LED on for 5 seconds, and then our yellow LED on for 1 second, making it repeat continuously.
Right-click on the "Pinoo Program" command. In the window that opens, we select the "Upload to Arduino" option.
On the page that opens, we click on the "Upload to Arduino" button, which is selected in red. Our codes are uploaded to our pinoo control card.
After the “Installation Finished” message comes, click the “Close” button. After the installation is finished, the battery holder is inserted and the project is run.
Working Status of the Project:
The working state of our traffic light project.


.jpg)